
![[QP4220] Q-PAGE™ TGN Precast Gel (Mini, 15 wells, 10%), 10 gels](/web/image/product.template/455/image?unique=600eed9)
![[QP4220] Q-PAGE™ TGN Precast Gel (Mini, 15 wells, 10%), 10 gels](/web/image/product.image/259/image?unique=db64f2d)
![[QP4220] Q-PAGE™ TGN Precast Gel (Mini, 15 wells, 10%), 10 gels](/web/image/product.image/267/image?unique=abc96ae)
![[QP4220] Q-PAGE™ TGN Precast Gel (Mini, 15 wells, 10%), 10 gels](/website/image/product.template/455/image/90x90)
![[QP4220] Q-PAGE™ TGN Precast Gel (Mini, 15 wells, 10%), 10 gels](/website/image/product.image/259/image/90x90)
![[QP4220] Q-PAGE™ TGN Precast Gel (Mini, 15 wells, 10%), 10 gels](/website/image/product.image/267/image/90x90)
Description
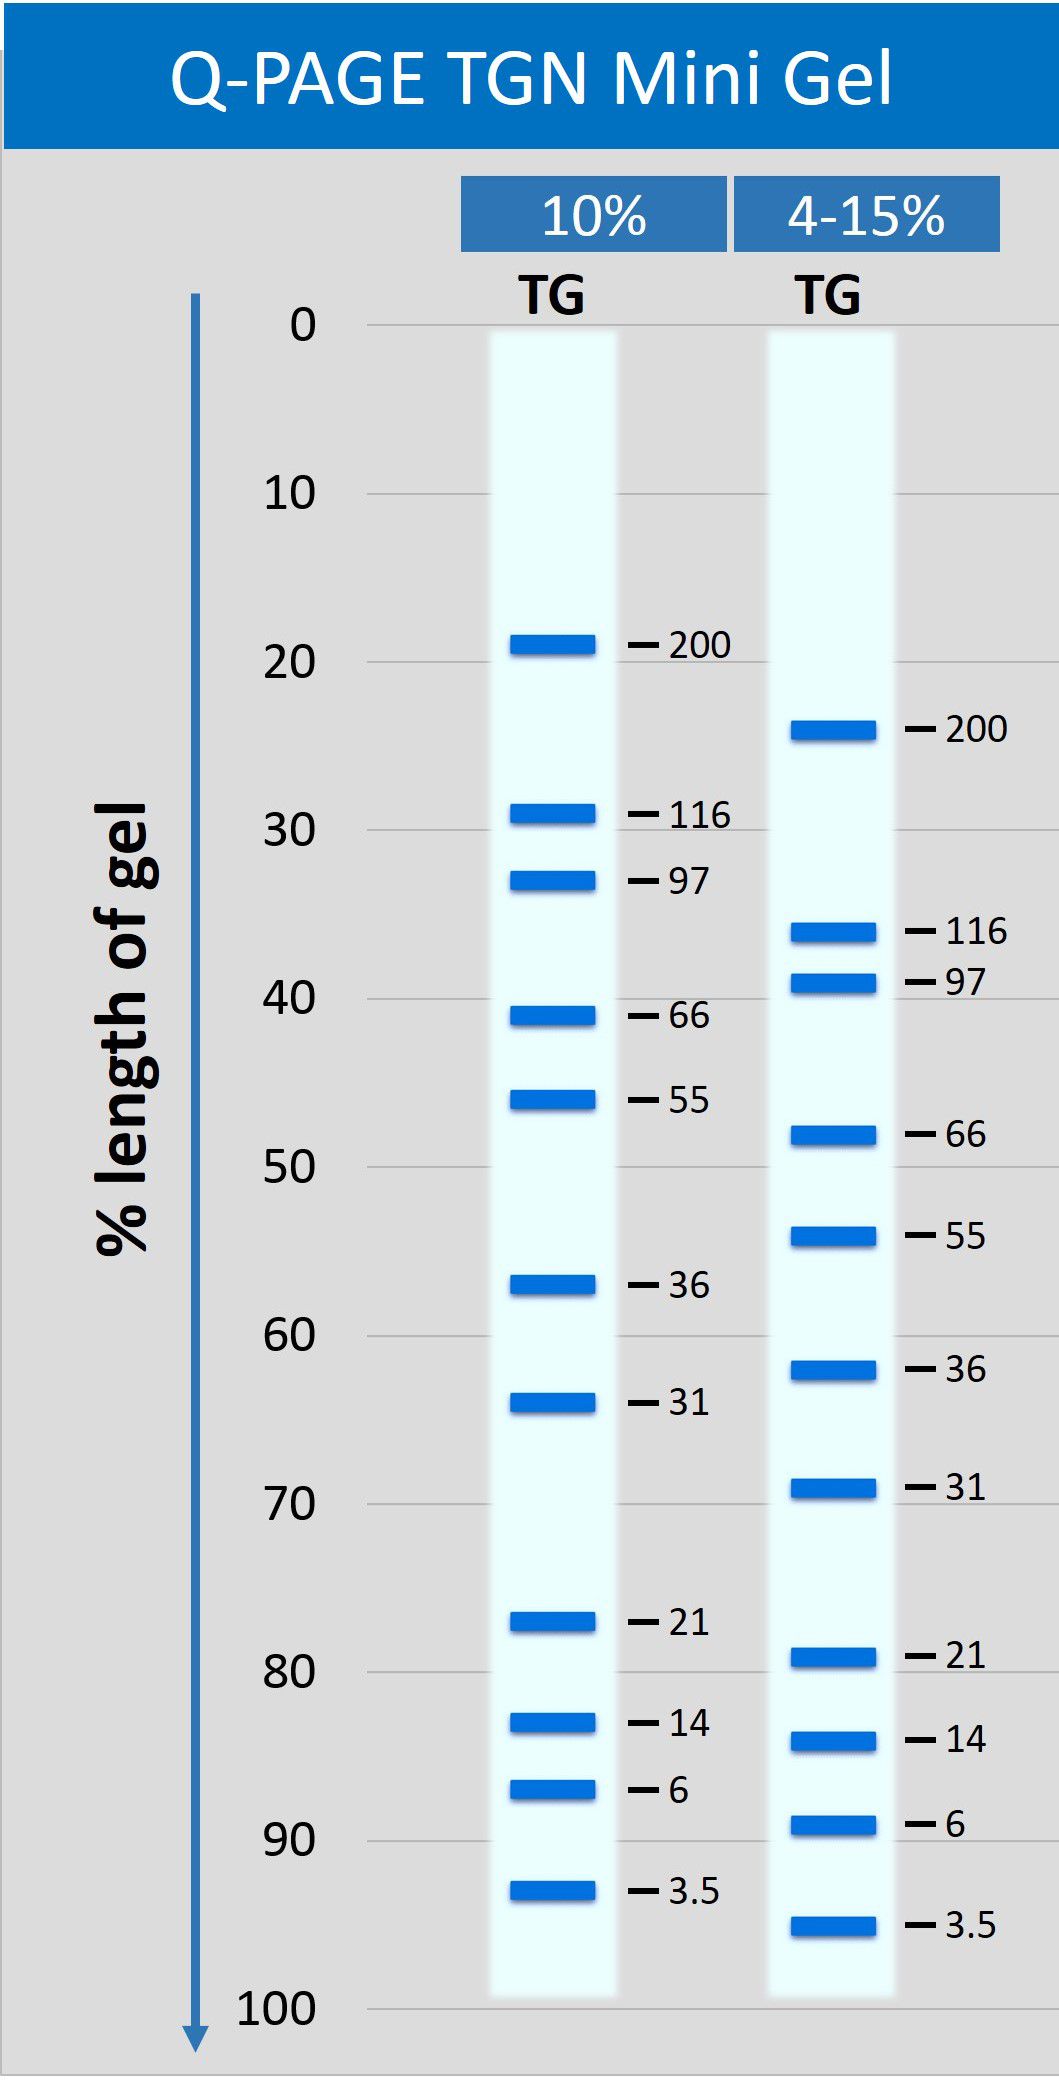
Q-PAGE™ TGN (Tris-Glycine Novel) Precast Gels are ready-to-use acrylamide gels for SDS-PAGE running in Tris-Glycine buffer system. With unique formula, Q-PAGE™ TGN Precast Gels perform enhanced speed, better separation, and longer shelf life as compared with conventional Laemmli Tris-HCl gels. The protein migration patterns in Q-PAGE™ TGN series, however, are similar with typical Laemmli Tris-HCl gels, and thus Q-PAGE™ TGN Precast Gels are compatible to traditional SDS-PAGE and subsequent analyses.
Q-PAGE™ TGN Precast Gels are available in gradient (4 to 15%) and fixed (10%) concentrations of polyacrylamide in 12- and 15-well formats. Two available cassette sizes, Mini (10 x 8.3 cm) and Midi (10 x 10 cm), are compatible with most popular protein electrophoresis systems. Q-PAGE™ Mini (QP4XXX) Gels are suitable for Bio-Rad® and other systems. Q-PAGE™ Midi (QP5XXX) Gels are suitable for Invitrogen® XCell SureLock® Mini-Cell, Invitrogen® Mini Gel Tank, Hoefer SE260, and other systems.
Key Features
User-friendly gel cassette:
Numbered and framed wells for sample loading
Labeled warning sign and green tape as reminder
Enhanced gel performance:
Enhanced gel electrophoresis speed
Better band separation
Stable for shipping at ambient temperature
Easy compatibility:
Available as homogeneous and adjusted gradient gels for a wide range of protein separation.
Compatible with most popular protein electrophoresis systems
Storage and stability
Store Q-PAGE™ Precast Gels at 4°C for periods up to 12 months.
Do not freeze Q-PAGE™ Precast Gels. Remove tape and comb before electrophoresis.
Keep Q-PAGE™ Precast Gels flat during storage.
Technical
Quick running, clear bands
Q-PAGE™ TGN Precast Gel can separate protein in 19 minutes using 300 V.
QP4220 Specifications
|
Gel |
TGN (Tris-Glycine-Novel) |
|
|
Buffer systems |
Tris-Glycine (Laemmli) |
|
|
Features |
Quick running, clear bands |
|
|
Cassette size |
Mini Gel (10 X 8.3 cm) |
|
|
Gel dimensions
|
8.1 x 7.4 x 0.1 cm (W x L x thickness) cm |
|
|
Electrophoresis system |
Bio-Rad systems |
|
|
Well format & Capacity |
15 wells, 22 μl/well |
|
|
Gel percentage |
10 % |
|
|
Accessory tray |
Product description Tip card Gel remover Cassette opener |
|
Setting Up and Running Q-PAGE™ Mini Precast Gel
Tips for removing Q-PAGE Mini Gel from cassette
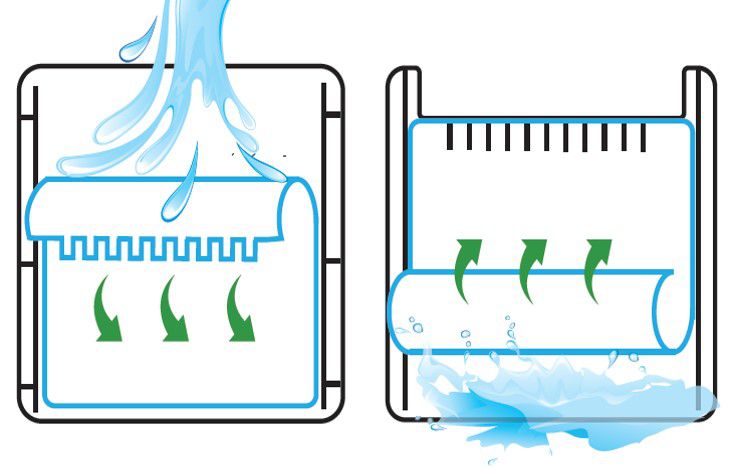
Setting up gel/membrane sandwich for Western transfer
Recommendations/Tips for Gel Running
1. Remove comb and tape before adaption.
2. Use fresh 1X running buffer for the inner cathode chamber.
3. Rinse the wells before sample loading.
4. Try 200 V first, and optimize the voltage and running time if needed. Do not set voltage lower than 100 V.
Sample Preparation for SDS-PAGE
1. Mix protein sample with 2X sample buffer.
2. Heat the diluted samples at 95°C for 5 min or at 70°C for 10 min.
3. Cool the diluted samples to 4°C and spin down the water condensed on tube surface. (If there is high viscosity part at bottom of tube, transfer supernatant to a new tube.)
Prepare Q-PAGE™ for Sample Loading
1. Open the blister tray of Q-PAGE™ Precast Gel.
2. Briefly rinse the gel cassette with ddH2O.
3. Remove tape and comb; avoid squeezing the gel.
4. Adapt Q-PAGE™ to electrophoresis system; instruction are provided below. (BioRad Mini-PROTEAN® Core Electrophoresis System is recommended.)
5. Use a pipette to gently wash the wells with running buffer to remove residual storage buffer.
6. Fill the wells with running buffer prior to sample loading.
7. Load samples and pre-stained protein marker into numbered wells.
8. Fill both inner and outer chambers with running buffer to the highest level. Ensure gel wells are completely covered.
Power Setting for Running Q-PAGE™
Optimize the voltage and running time if needed.
Voltage*1 | 150 V | 200 V*2 | 250 V*3 | 300 V*3 |
Running Time*4 | 40-60 mins | 30-40 mins | 25-35 mins | 15-25 mins |
Expected Current Initial (per gel) Final (per gel) |
40-50 mA 10-20 mA |
50-60 mA 25-30 mA |
80-90 mA 35-40 mA |
90-100 mA 40-50 mA |
Expected temperature | 25-30°C | 25-40 °C | 25-40°C | 25-40°C |
*1 Set voltage higher than 100 V is recommended
*2 Try 200 V first, and optimize the voltage and running time if needed.
*3For higher voltage conditions, please use fresh running buffer for inner and outer chambers
*4 Running time varies depending on gel percentage, running buffer, temperature, and power supply.
Remove Q-PAGE™ Gel from Cassette
Open cassette immediately after electrophoresis. Avoid gel drying.
1. Insert the cassette opener into corners of cassette.
2. Sequentially pry the opener to separate the two plates.
3. Gently pull two plates apart from the top of cassette.
4. Carefully detach the gel either from the bottom or the top side of the cassette.
-Avoid diagonally peeling the gel from the corner.
-Use water to help gel detachment if needed.
5. Gently remove the gel for further staining or Western blotting.
Proteins separated using Q-PAGE™ Precast Gels can be further stained with most popular staining reagents, such as Coomassie dyes (R-250 or G-250), Silver-stain solution, and FluoroStain™ Protein Fluorescent Staining Dye. (Cat. No. PS1000)
1. After protein separation using Q-PAGE™, gently detach QPAGE™ from cassette and then equilibrate the gel in transfer buffer.
2. Pre-soak blotting membrane and filter papers in transfer buffer.
*Activate PVDF membrane in methanol before soaking in transfer buffer.
**Prepare 6 filter papers for one gel/membrane sandwich.
3. Assemble transfer sandwich by orientating cathode, sponge, filter papers, gel, membrane, filter papers, sponge, and anode. The protein goes to the direction of cathode to anode.
4. Carefully move roller over the gel/membrane to remove air bubbles and excess buffer until complete contact is established.
5. Insert transfer cassette into transfer module. Notice that black side of cassette should be next to black side of module.
6. Fill transfer tank with pre-cooled transfer buffer to the highest water level.
7. Set constant voltage at 100 V. Transfer for 90 minutes at low temperature condition. Pre-stained protein marker should be visible on the membrane after transfer is completed. Transfer of proteins to the membrane can be checked using Ponceau S staining before blocking step.
Supplemental Information for Using Q-PAGE™ Precast Gel
Adapting Q-PAGE™ Mini Precast Gel to BioRad Mini-PROTEAN® Core
1. After removing comb and tape, place the Q-PAGE™ Mini Precast Gel with notched plate facing toward inner chamber.
2. Align the notched plate to ensure the edge sits just below the notch at the top of green gasket.
3. Gently press gel cassette toward green gasket and then lock gel cassette with two green arms. Avoid squeezing the cassette and gel.
4. Fill inner chamber with running buffer to check tightness of seal. If necessary, reassemble and check the seal again.
5. Fill inner chamber with running buffer to ensure gel wells are completely covered.
6. Fill outer chamber with running buffer to the highest level.
Adapting Q-PAGE™ Mini Precast Gels to other electrophoresis system, please follow the manufacturer’s instruction.
Buffer recipes
2X sample buffer with reducing agent
62.5 mM Tris-HCl pH 6.8, 2% SDS, 25% (v/v) glycerol, 0.01% bromophenol blue, 5% β-mercaptoethanol or 100 mM DTT (added fresh)
10X Tris-Glycine running buffer
30.0 g Tris base, 144.0 g Glycine, 10.0 g SDS. Bring up the volume to 1 L with ddH2O.
1X running buffer
Dilute 100 ml 10X running buffer with 900 ml ddH2O.
10X transfer buffer
30.0 g Tris base, 144.0 g Glycine. Bring up the volume to 1 L with ddH2O.
1X transfer buffer
*Cool 1X transfer buffer to 4°C before using.
Dilute 100 ml 10X transfer buffer with 200 ml methanol and 700 ml ddH2O.
|
Troubleshooting Guidelines |
||
|
Problem |
Possible Cause |
Suggested Solution |
|
Well deformation |
Pull one side of comb out of cassette. |
Smoothly pull the comb straight out of the cassette. |
|
Bubbles between gel and cassette |
Gel has been frozen or stored at wrong temperature. |
Store Q-PAGE Precast Gels at 4°C. |
|
Buffer leaking from the inner chamber |
Untight assembly of gels to the electrode modules |
Reassemble Q-PAGE gels into the electrode modules. Fill outer chamber with 1X running buffer to the highest level. |
|
Samples do not sink into the wells. |
Residual gel storage buffer in the wells |
Rinse the gel wells with ddH2O or 1X running buffer before loading. |
|
Insufficient sample buffer |
Use more sample buffer to prepare samples. |
|
|
Current is zero and sample do not migrate into gel |
Tape at bottom of gel not removed |
Remove tape |
|
Gels run faster or more slowly than expected. |
Incorrect running buffer |
Check buffer composition. Use fresh 1X running buffer for inner chamber. |
|
Crooked bands at middle or bottom of gel |
Gel has been frozen or stored at wrong temperature. |
Store Q-PAGE Precast Gels at 4°C. |
|
Incorrect running buffer |
Check buffer composition. Use fresh 1X running buffer for inner chamber. |
|
|
Band pattern curves toward one or both sides of gel. |
Buffer leaking from the inner chamber |
Check assembly of gels into the electrode modules. |
|
Excessive heating of gel |
Check buffer composition. Or dilute running buffer to 0.5-0.75X. Do not exceed recommended running conditions. |
|
|
Insufficient buffer in inner or outer buffer chamber |
Fill inner and outer chambers to completely cover gel wells. |
|
|
Poor resolution or fuzzy bands |
Excessive heating of gel |
Check buffer composition. Do not exceed recommended running conditions. |
|
Incorrect running buffer |
Check buffer composition. |
|
|
Bands are missing on the membrane after Western transferring. |
Proteins move in the wrong direction |
Check the order of gel/membrane sandwich assembly, the direction of transfer cassette in transfer modules, and the polarity of connections to power supply. |
|
Swirls or missing bands; bands trail off in multiple directions on the membrane after Western transferring. |
Contact between the membrane and the gel was poor; Air bubbles or excess buffer remains between the blotting membrane and the gel. |
Use thicker/more filter paper in the gel/membrane sandwich Remove air bubbles and excess buffer between gel and membrane by carefully moving the roller over the membrane. |
|
The buffer has leaked when put Q-PAGE™ TGN Midi Precast Gel in the device Hoefer SE260. |
Dislocation of the gel cassette in the electrophoresis tank. |
Place the gel cassette directly down to the bottom of the electrophoresis tank. The bottom edge of the gel cassette should be completely against the bottom of the electrophoresis tank. |
|
Looseness of the spring in spring clamps. |
Replace it with a new spring clamp. |
|
|
Dirt, nicks or abrasion on the gray silicone rubber gasket. |
Clean away any gel remains adhering to the foam gasket. Remove the gray silicone rubber gasket from the core. If there is nicks or abrasion, replace it with a new one. |
|
|
Apparent molecular sizes of prestained protein markers are different as indicated. |
Prestained protein markers used have
not been calibrated |
Calibrate prestained protein markers against unstained proteins of known size or use SMOBIO’s ExcelBand™ Protein Markers. |
Q-PAGE™ Precast Gel
Gel Type | Bis-Tris | TGN (Tris-Glycine-Novel) | ||||||
Buffer systems | MOPS and MES | Tris-Glycine (Laemmli) | ||||||
Features | Clear and sharp bands, high resolution | Quick running, clear bands | ||||||
Cassette size | Mini Gel | Midi Gel | Mini Gel | Midi Gel | ||||
Electrophoresis system | Bio-Rad systems | Mini Gel Tank Xcell SureLock, Hoefer SE260 | Bio-Rad systems | Mini Gel Tank Xcell SureLock, Hoefer SE260 | ||||
Well format & Capacity | 12 wells, | 15 wells, | 12 wells, | 15 wells, 28 μl/well | 12 wells, 25 μl/well | 15 wells, 22 μl/well | 12 wells, 40 μl/well | 15 wells, 28 μl/well |
Gel percentage/ Cat. No. | 8% | 8% | 8% | 8% | 10% | 10% | 10% | 10% |
QP2110 | QP2120 | QP3110 | QP3120 | QP4210 | QP4220 | QP5210 | QP5220 | |
12% | 12% | 12% | 12% | 4-15% | 4-15% | 4-15% | 4-15% | |
QP2310 | QP2320 | QP3310 | QP3320 | QP4510 | QP4520 | QP5510 | QP5520 | |
4-12% | 4-12% | 4-12% | 4-12% |
|
|
|
| |
QP2510 | QP2520 | QP3510 | QP3520 |
|
|
|
| |
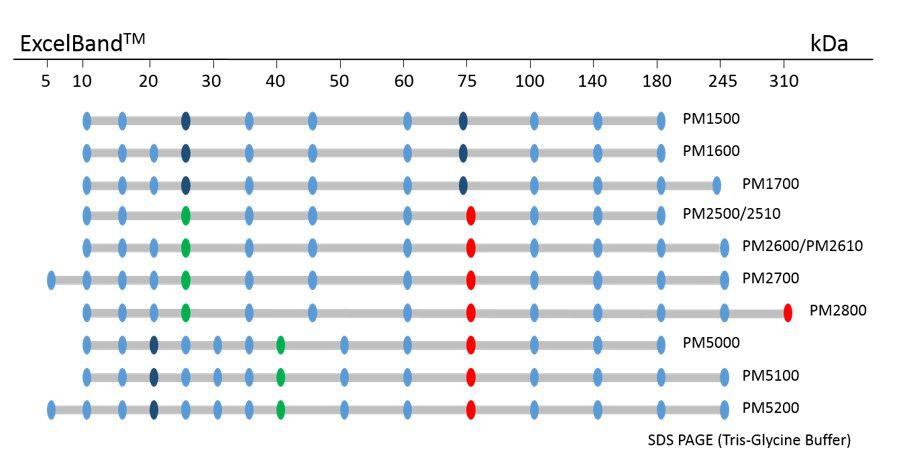
ExcelBand™ Protein Markers
Ready-to-use— premixed with a loading buffer for direct loading, no need to boil
Broad range— 310 kDa to 5 kDa
Pre-stained bands — for monitoring protein separation during electrophoresis and Western blotting transferring efficiency on membrane
Enhanced bands— for quick reference
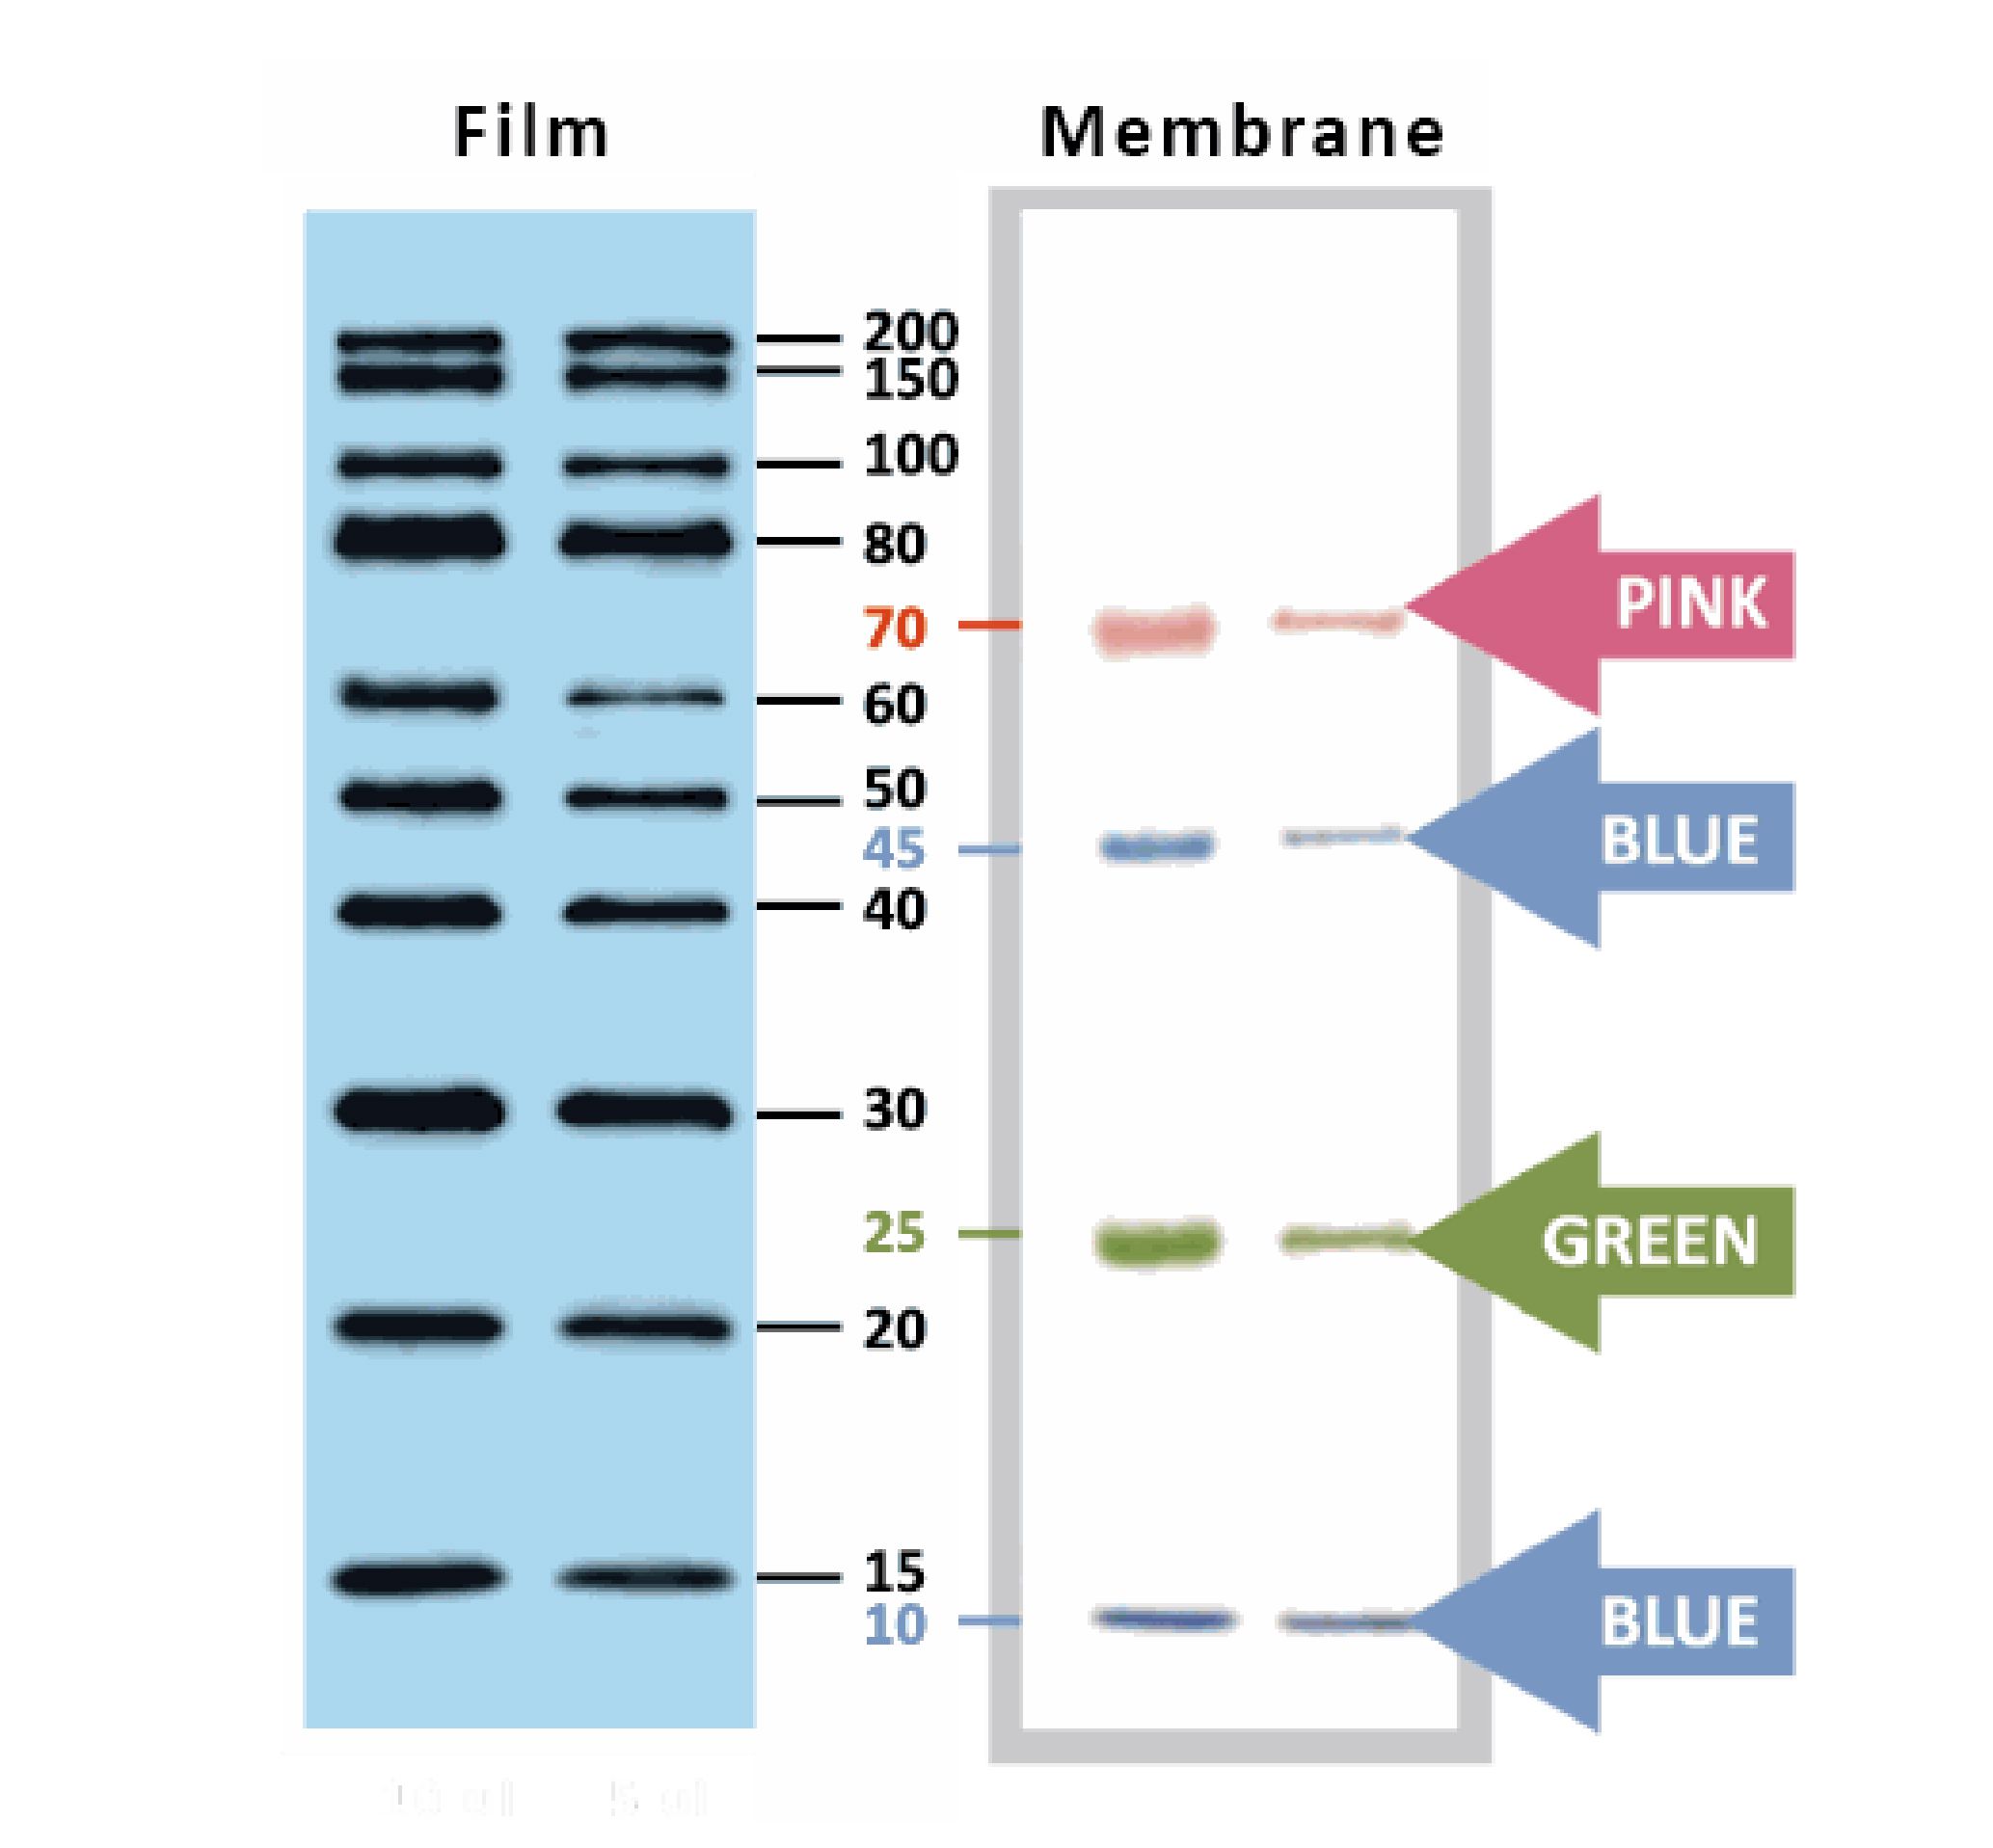
YesBlot™ Western Marker I
Ready-to-use — no need of mixing or heating before sample loading
Direct visualization — 10 IgG-binding proteins for direct visualization on Western blots
Pre-stained bands — 4 pre-stained proteins for monitoring protein separation during electrophoresis and Western blotting transferring efficiency on membrane
Wide range — 10 clear bands from 15 to 200 kDa for size estimation
Quick reference — two enhanced bands (30 and 80 kDa)
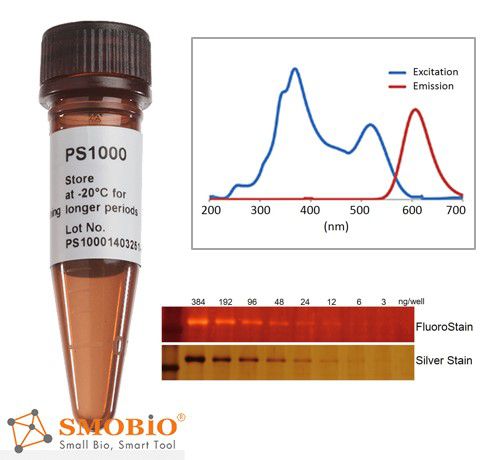
FluoroStain™ Protein Fluorescent Staining Dye
Compatible to MASS analysis — compatible to the analysis of mass spectra, such as LC-MS/MS, MALDI-TOF, and etc.
High sensitivity — detection level achieve ~3 ng, similar to silver staining
Substitution of the Coomassie Blue protein staining method